If you’re new to programming, you should definitely read part 1. The author realize that part 1 was a tad too large and therefore parts in this series will come as more bite-sized chunks from now on.
In this part we’ll go into more details around so called conditional statements, often implemented as if statements.

What Are Conditional Statements?
As we mentioned in part 1, all the diamonds in the flowcharts are conditional statements. These diamonds are places in the control flow where what to do next is dependent on something. First you check the dependency, then you run a certain chunk of code based on that dependency. In practice the dependency check often boils down to checking if a variable is equal, unequal, larger or smaller than a constant or another variable.
The If Statement
The most basic conditional statement across most languages is the if statement. It basically works such that you check if a condition is true. If it is, you run a chunk of code. If it’s not, you skip that part of code.
Using Only “if”
if (happy) then
	smile
	jump

continue with your life
In this example you smile and jump only if you’re happy. You continue with your life no matter if you’re happy or not, but you only smile and jump if you’re happy.
Using “if” and “else”
if (happy) then
	smile
else
	pout

continue with your life
In this example we extend the if statement with an else part. This part catches everything that didn’t get caught in the happy check above it. So if you’re happy, you smile. If you’re NOT happy (you might be angry, sad, depressed or anything else besides happy), you pout. If you’re happy, you skip the pouting, which is very important to remember.
Lastly, you continue with your life no matter what mood you’re in.
Using Both “if”, “else if” and “else”
if (happy) then
	smile
else if (angry) then
	shout
else if (sad) then
	cry
else
	cookDinner
This last simple pseudo code example has a couple if else ifs thrown in there. They work as you probably think. If you’re happy you smile, but you don’t shout, cry or cook dinner. If you’re angry you shout, but you don’t smile, cry or cook dinner. The same goes for sad and cry. If you’re neither happy, angry or sad you cook dinner, but only then.
If you are both happy and angry (I guess it’s theoretically possible) you smile, but you don’t shout. This is only because the happy chunk comes before the angry chunk. This is a nice way to do simple prioritization.
Remember that no matter how many else ifs you use (if any), you DON’T have to include an else at the bottom. The only thing that’s required is an if at the top. And if you want an else-part, it needs to be at the bottom.
Remember: you enter ONLY ONE of these (either happy, angry, sad or the else)!
Actual Examples
Let’s use one of the examples from part 1 to demonstrate how to use if statements in practice.
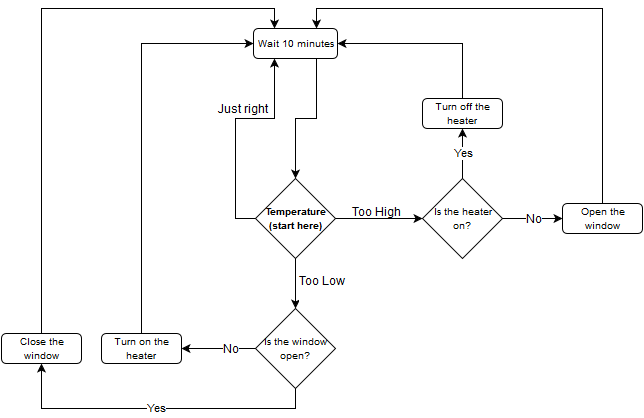
In the system above, let’s check if the window is open. Let’s say that the status of the window is stored in an integer variable called window. This variable is initialized and updated with the latest window status somewhere else in the code. If the window is closed, the value of window is 0. If it’s open, the value is 1.
Pseudo Code
if (window is 0) then
	turn on the heater
else if (window is 1) then
	close the window
else
	something is not right, and you should take care of it
We could have managed without the error handling at the bottom, but it’s a nice way to detect errors in your system.
Arduino/C++
First we’re going to do this just as in the pseudo code, then in a bit more elegant (and functional) way.
if(window == 0){
	//code for turning on the heater
}
else if(window == 1){
	//code for closing the window
}
else{
	//error! code for handling this
}
Notice the double == signs. These are necessary when comparing. When I started programming C/C++ I often forgot the extra =.
Check out this page for the set of relational or comparison operators in C and C++ as well as several other examples. The curly brackets are needed if you have several lines inside an if statement. If you have only one line like below, you can skip them. It’s usually a good idea to include them anyway.
if(!window)
	heater_control(1);
else if(window == 1)
	window_control(0);
else
	Serial.println("ERROR!");
The most important difference here is the !-sign before window instead of window == 0. In situations like this these two ways of writing it is completely equivalent. If we wanted to check if window is something else than zero, we could skip the ! and just write window. To put it in another way: the condition window is true if it’s something else than zero. The condition is false if it is zero.
Above we also call the functions heater_control() and window_control(). We’ll write more about functions in a later post. For now let’s assume that heater_control(1); turns on the heater and that window_control(0) closes the window.
Serial.println() is an Arduino-function which prints the containments inside the brackets, in this case ERROR!, over serial to for instance your PC.
Python
if not window:
	heater_control(1)
elif window == 1:
	window_control(0)
else:
	print("ERROR!")
This is roughly equivalent to the second Arduino example.
Important differences:
- The ! is replaced by not.
- No brackets (and no curly brackets for multiple lines).
- No semicolons at the end of the lines.
- else if is now called elif.
- Python’s print() function, prints something to console.
Also remember from part 1 that the indentations in Python actually matters, unlike in Arduino/C++ where we only use indentation for readability. Python’s indents sort of replace Arduino/C++’s curly brackets.
For a list of comparison operators in Python as well as more examples, visit this page.
Expanding with Logical Operators
We have already used one logical operator, namely the NOT operator (in Arduino/C++ this is written as a !). There are two other common logical operators in programming: AND and OR. With these three you can construct other operators such as XOR, NOR or NAND.
These operators are super useful when for instance dealing with if statements.
We’ll show why by an abstract example:
if ((((a is 3) OR (a is smaller than or equal to 1)) AND b is larger than 2) OR c is not 4) then
	x is 5
In this abstract example x is 5 only if one or more of these conditions are true
- c not 4
- b larger than 2 AND a equal to 3
- b larger than 2 and a smaller than or equal to 1
The use of brackets here is crucial to get the logic behaviour you want.
Here’s the same example implemented in our two languages:
Arduino/C++
if(((a == 3 || a =< 1) && b > 2) || c != 4)
	x = 5;
Python
if ((a == 3 or a =< 1) and b > 2) or c != 4:
	x = 5
The Switch Case
The switch case statement is a substitute for long if statements in many languages for better readability. Python does NOT have switch case statements, but there are workarounds. We’re not going to go into details around switch case statement here, but you should know about it. Read about the C/C++/Arduino version here.
Last Words
If statements are one of the utmost important building blocks in programming. Without them you won’t be able to do much sensible in your programs. Remember your comparison operators as well as bracket usage when using logical operators.
Also remember that you only enter ONE if, else if or else within a single if statement.
This was part 2 in this series. Continue to part 3 where we look at loops by clicking here!