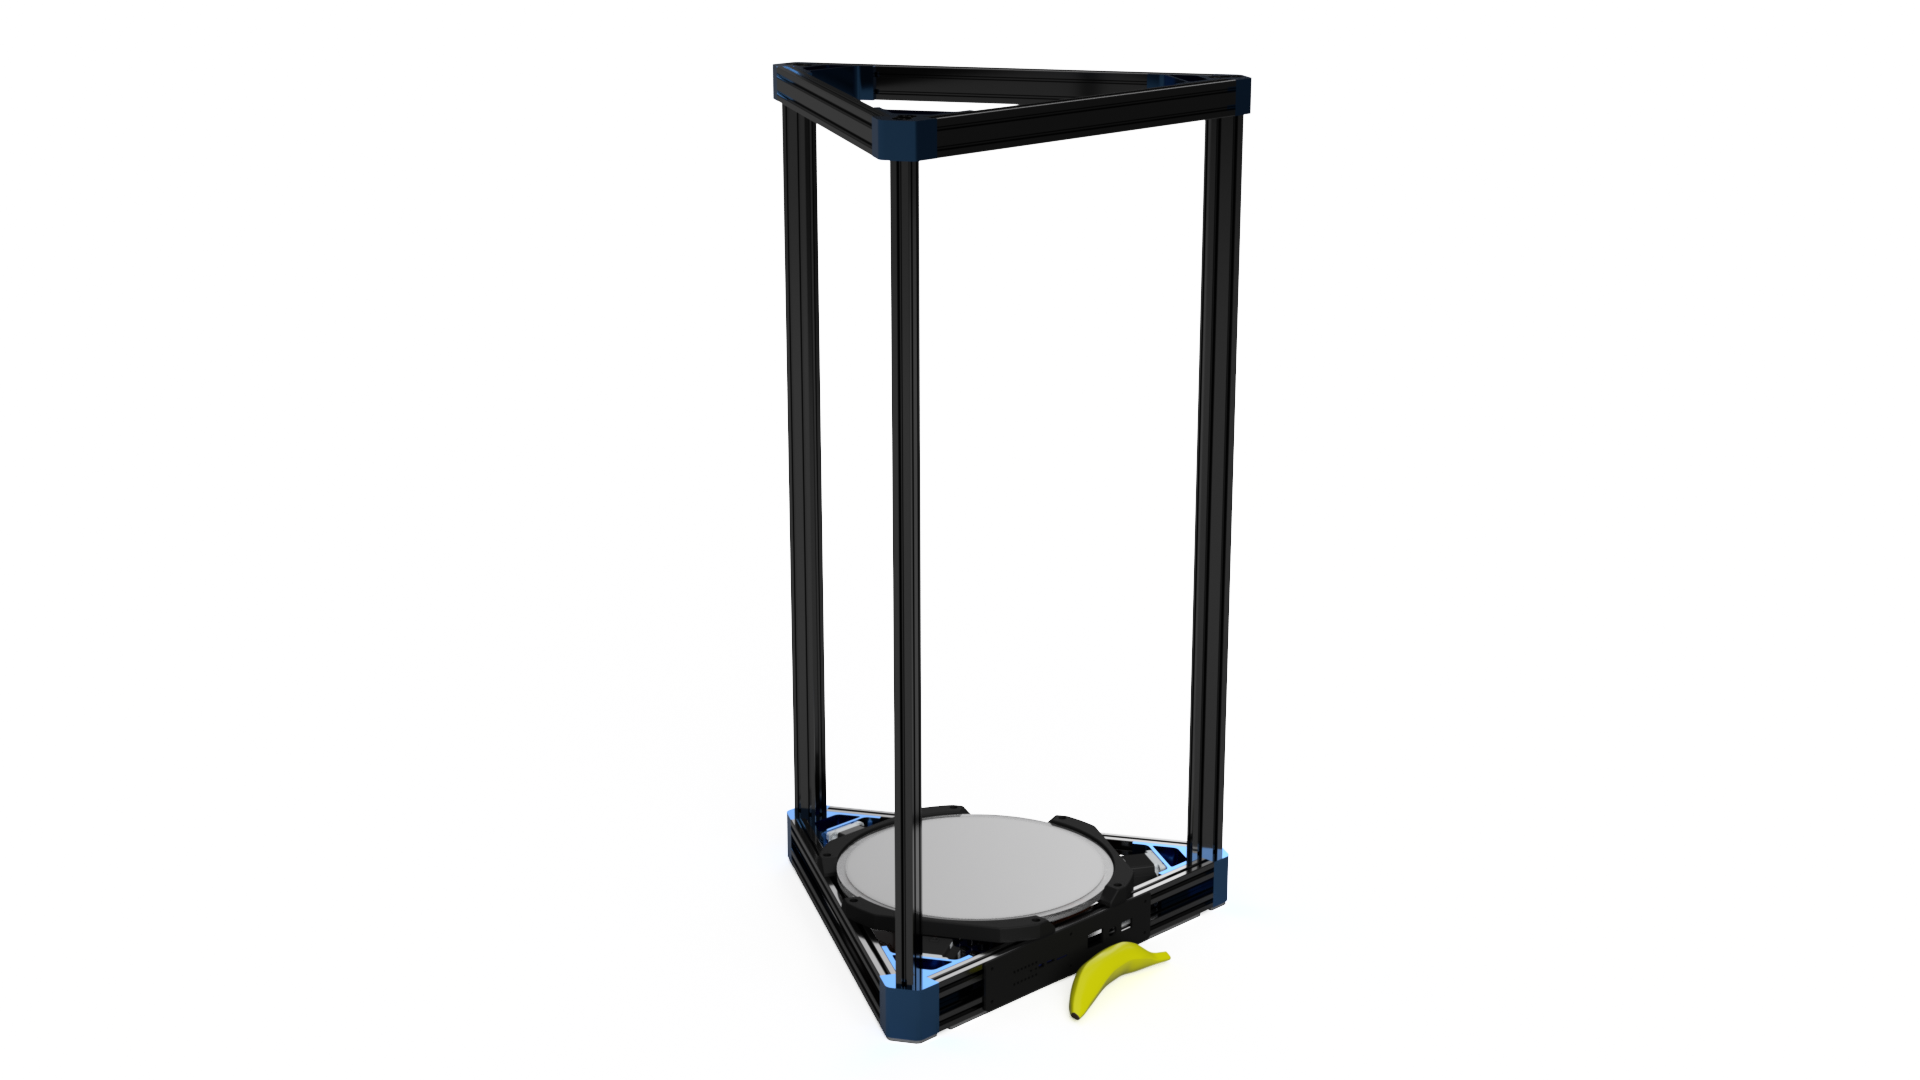
Access to a 3D printer is very important for us in Norwegian Creations. Now we’ve decided that we want to upgrade our 3D printer park with a new big and fast printer. This time we’re going all out with a top-of-the-line custom built delta printer!
The Kossel Delta Printer
The Kossel printer is not one specific printer such as for instance the Ultimaker 3, but rather a general design which is both sold fully assembled by different outlets as well as used as a build-your-own blueprint. The Kossel printer is based on the Rostock, which again is based on the Helium Frog.
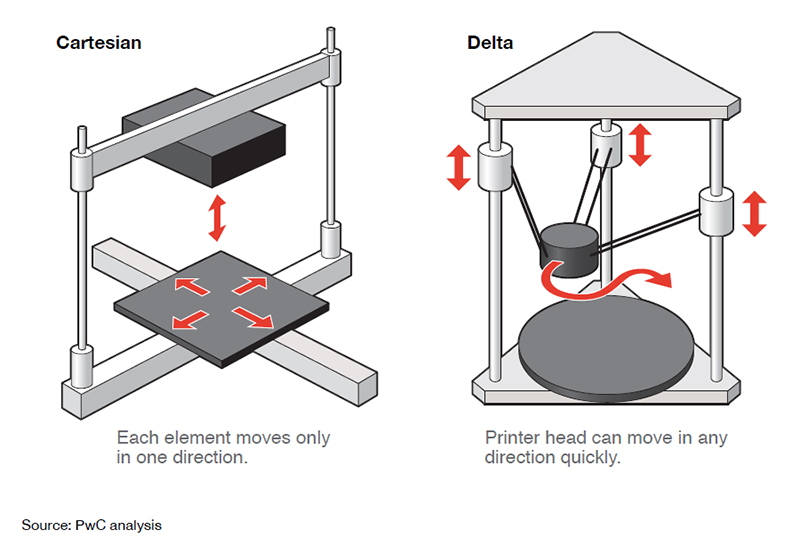
These printers are delta printers, which in design are quite different from the more common cartesian 3D printers. Instead of having the stepper motors controlling their own axes, the motors on delta printers must cooperate for each movement in every axis.
The biggest advantage with delta printers is that you get much faster movement due to the reduced moving weight. A couple of general disadvantages are that the frame is quite tall relative to effective print height and that it might be a bit more complex to set up and calibrate.
Our Kossel Build
First of all we want to thank Jardar Nordbø for all the advice and tips he gave us on how to build our own Kossel 3D printer! He has already built a Ø260 mm Kossel XL which we got a lot of inspiration from.
Our main goals with this build are:
- fast print speed,
- a large print area,
- tall build height,
- accurate prints, which implies good quality components.
Dimensions
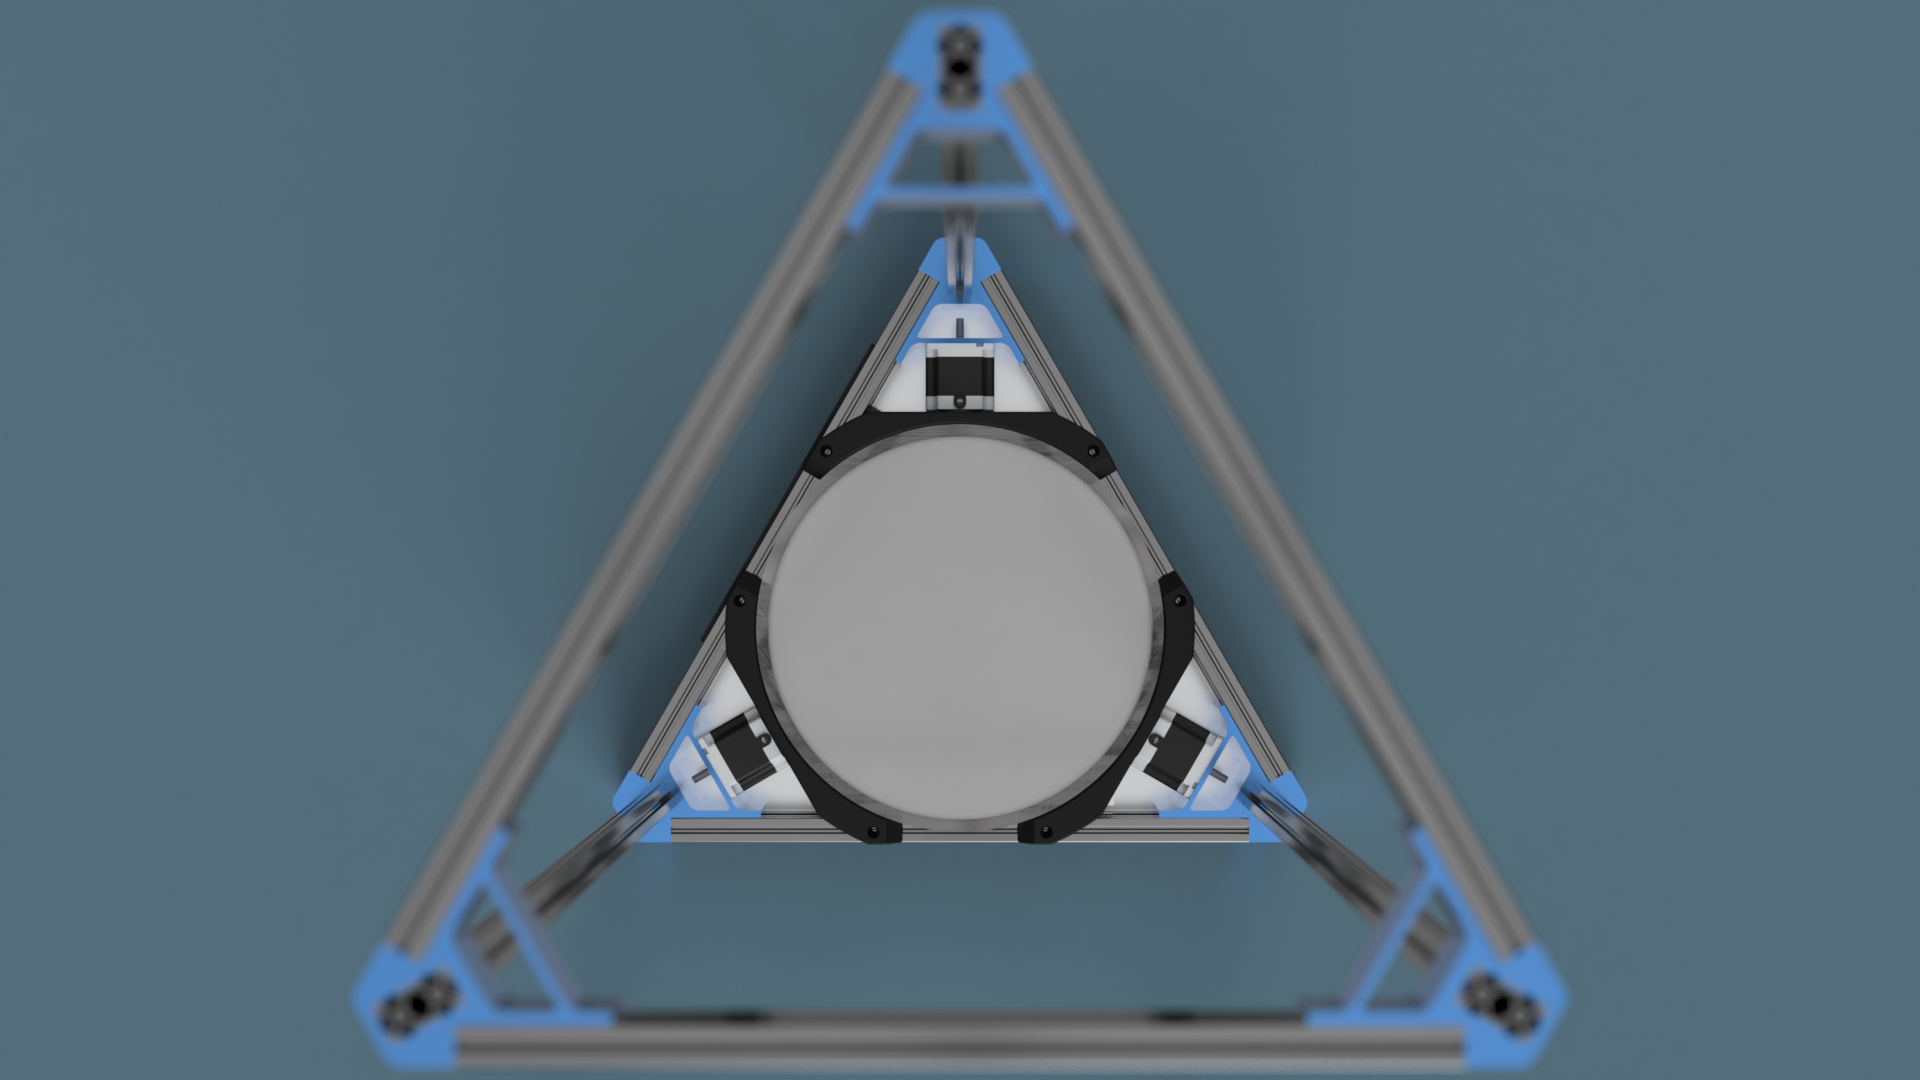
Build plate dimensions: Ø330 mm with Ø310 mm printable area. These dimensions were chosen based on what components and parts we could find.
We wanted the outer edge of the build plate to virtually touch the centerline of the horizontal frames and not exceed the frame as seen on many other Kossels. This led to horizontal extrusion lengths at 471 mm.
The length of the horizontal extrusions decides roughly how long the rods out to the effector need to be. Here we landed on 400 mm. This length will let the nozzle reach the outer limit of the printable area with a rod angle of around 20°, taking into account both effector joint and rail offset. 400 mm is 82% of the tower center to tower center distance which is not far from the 80% rule of thumb which is mentioned in several forums.
Height-wise we landed on a 1 m tall frame, which gives us a maximum print height of somewhere between 400 and 500 mm.
Frame Parts
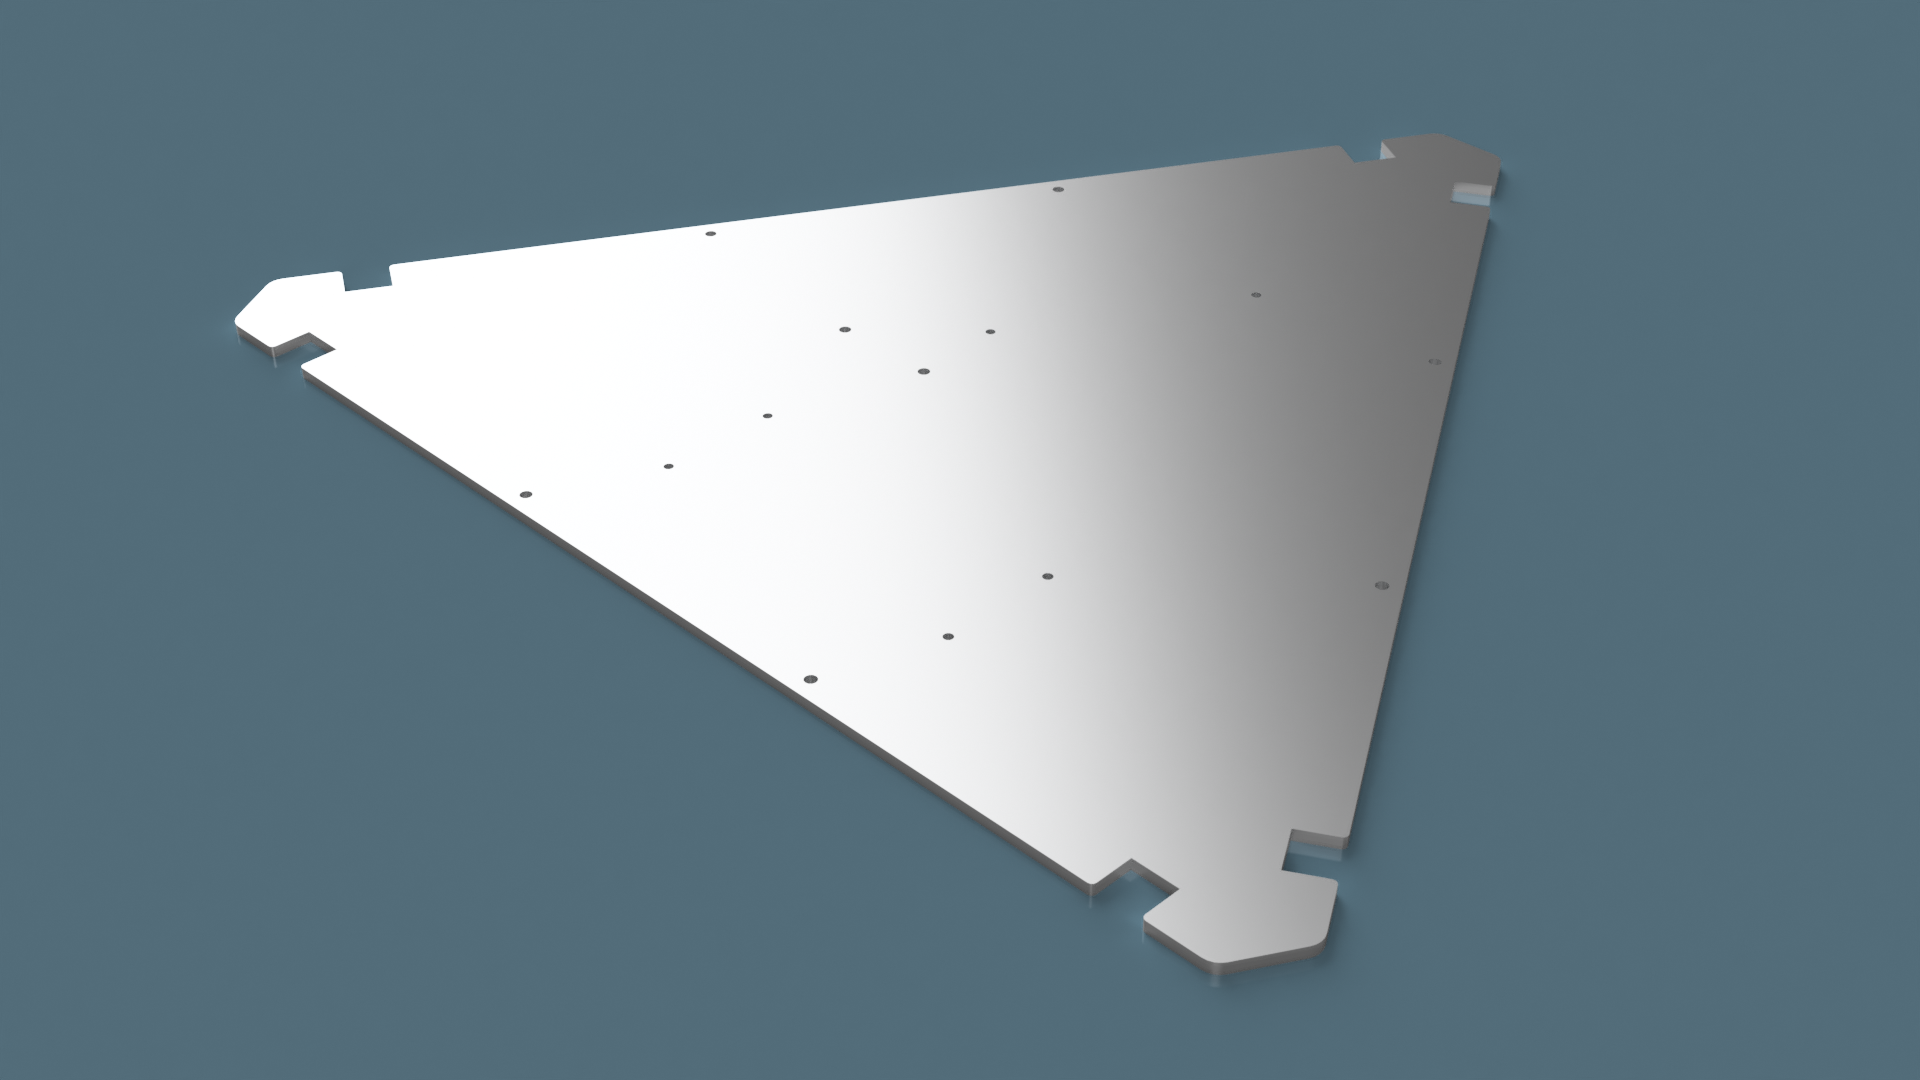
The frame (depending on how you define it) consists of aluminium extrusions and corners as well as a custom aluminium baseplate. The baseplate is not completely necessary, but it gives a nice “floor” to mount parts to as well as working as a heatsink for SSR and PSU.
Frame BOM:
- 6 pcs 471mm 20×20 extrusions (bottom horizontal)
- 3 pcs 471mm 20×40 extrusions (top horizontal)
- 3 pcs 1000mm 20×40 extrusions (vertical)
- A set of aluminium corners
- 5mm Aluminium base plate
We chose Misumi as supplier for the extrusions. A local company will laser cut the baseplate.
Build Plate
For the heater we wanted a powerful one in silicone (not Kapton), and with 230V we can draw current directly from the mains. We ended up with a Ø310 mm 550 W heater from Aliexpress which will give us plenty of power.
The heater will be fastened to the underside of a Ø330 mm x 5 mm aluminium disc which will be laser cutted by the same local company which does the baseplate. On top of the aluminium disc we’ll have an easily swapable glass plate. The reason for this is to more quickly start a new print after the last one is finished. This way we don’t have to wait for the glass to cool down. The glass will be Ø330 mm x 4 mm borosilicate glass plates, found on Aliexpress. These plates are made for delta 3D printers.
We also want to have a nice print surface so that we don’t need to use glue, hairspray or other adhesive to keep the print in place. We will use Ø310 mm Printbite sheets that will be glued to the glass plates. Printbite is compatible with IR-probes, which is required for this build.
Between the aluminium and the 3D printed build plate bracket we’ll glue 4 mm thick cut cork to protect the plastic from the heat.
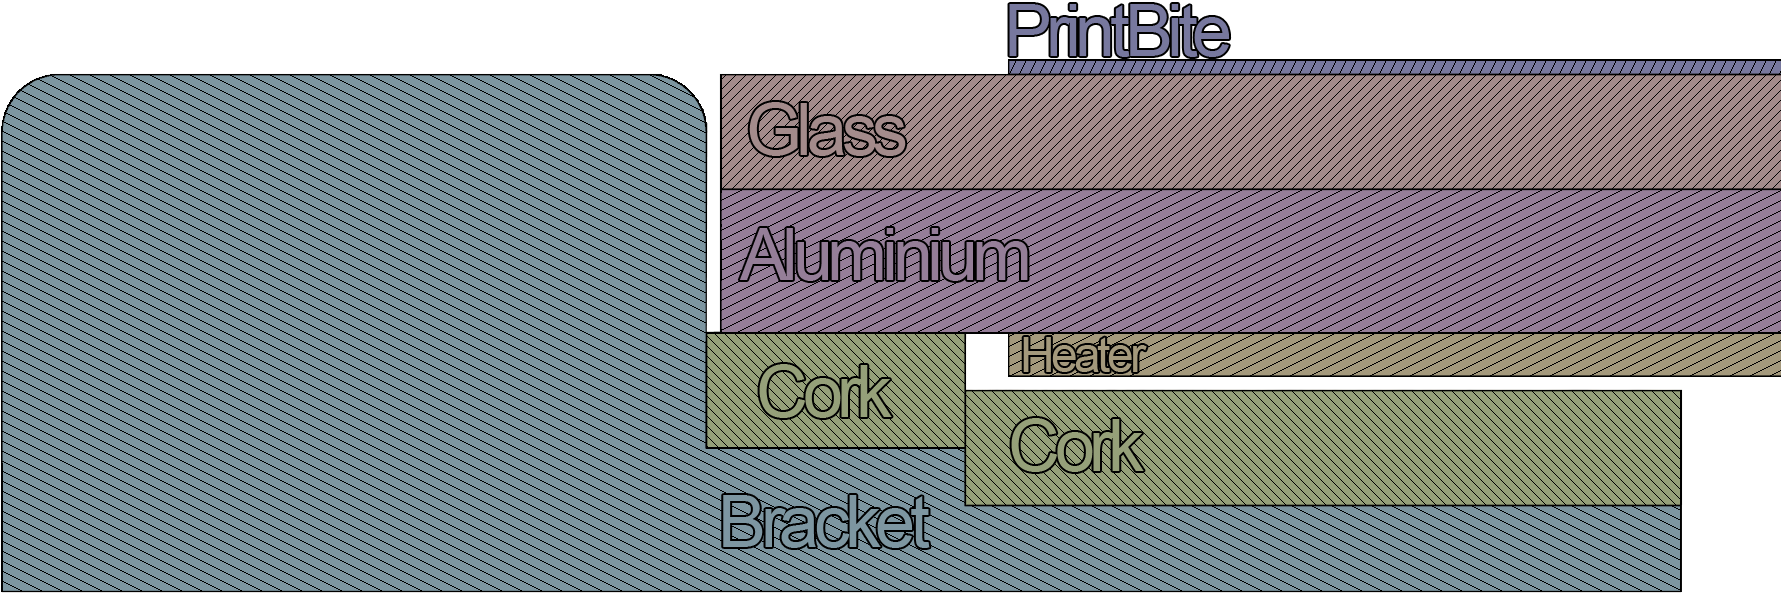
Build plate BOM:
- Bed heater
- Aluminium disc
- 2 pcs borosilicate glass plates
- 2 pcs Ø310 mm Printbite sheets
- Cork
Motion
Motor-wise we chose relatively powerful NEMA 23 stepper motors with 0.9°/step instead of the more commonly used NEMA 17. The 0.9°/step will give us better resolution than the more common 1.8°/step. We’ll use standard GT2 belts and pulleys which we’ve used in several other machines earlier.
The rails will be 800mm long MGN12-1H rails with H-carriages ordered from RobotDigg. The brackets on the carriages will be the point of fastening for both the belts and rods.
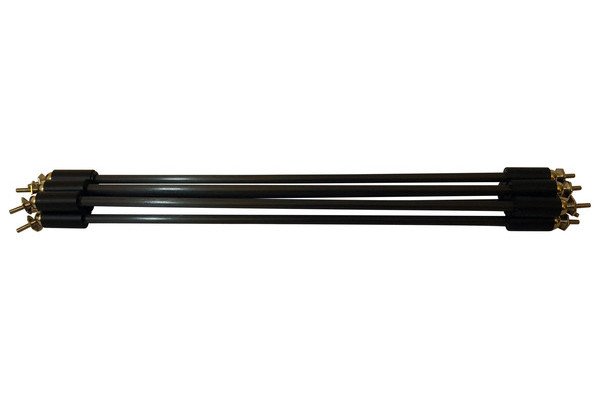
Good rods are important for delta printers. We’ve chosen to go for Haydn’s Carbon Fiber Arms from Blue Eagle Labs. These arms are high-precision, lightweight and strong, and comes with magnetic ball joints instead of the more common rod ends. As mentioned these will be 400 mm long. Blue Eagle Labs delivers custom length rods.
Motion BOM:
- 3 pcs stepper motors
- 3 pcs guide rail sets
- 1 complete set of rods, including 6 rods as well as cups and ball studs.
- 6 pcs GT2 pulleys and enough GT2 belt.
Effector and Extruder
The effector is the main moving piece in the center of the printer. We’ve chosen the 4th gen Flex3Drive for Kossel XL.
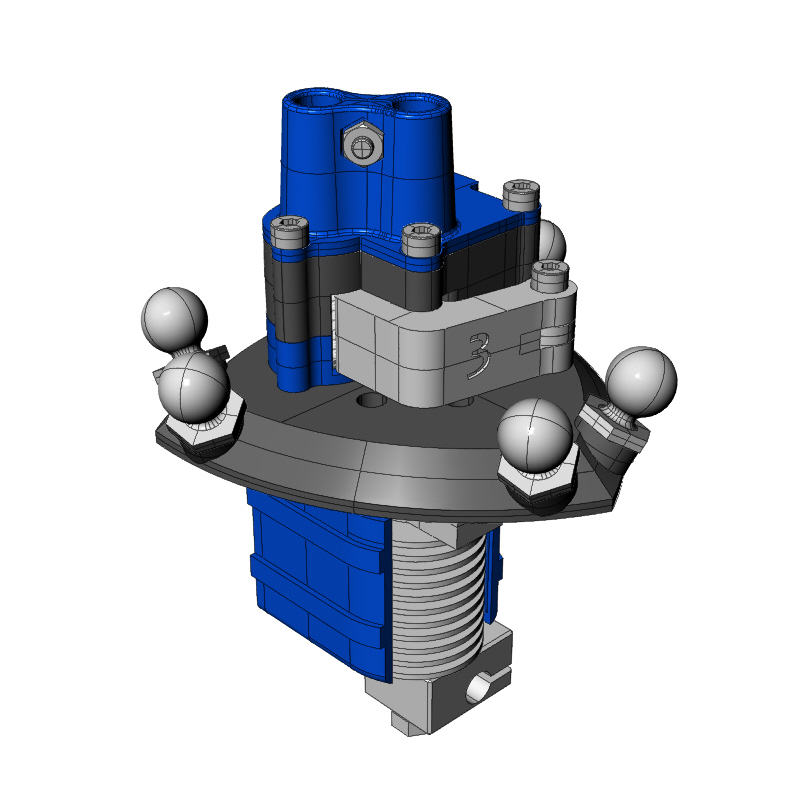
This effector comes with a flexible shaft which combines the best from both traditional direct and Bowden extruders: you don’t have to mount the extruder motor on the effector, and you also won’t have to deal with Bowden extruders’ poor retract abilities. The extruder motor is mounted on the frame and rotates a flexible shaft that goes out to the effector where the filament is fed down the hotend. We’ll either use a NEMA 17 or NEMA 14 stepper motor for extrusion.
This effector is also compatible with both the rods we’ve chosen as well as the hotend we’ll talk about below.
Effector and Extruder BOM:
- Effector
- Stepper motor
Hotend
To be able to print parts quickly we want to be able to use large nozzles while also have the ability to switch to smaller nozzles for more detailed prints. E3D’s Volcano hotend became our choice to meet these requirements. E3D delivers complete packs with everything you need (hotend-wise). However, we wanted PT100 sensor and 40 W heater cartridge, which isn’t part of the volcano pack, and therefore it was cheaper for us to buy the parts seperately.
Hotend BOM:
- Heatsink
- 3 pcs fans
- Heat break
- Temperature sensor
- Heater block
- Heater cartridge
- Fan duct
- 1.75 mm nozzles (0.4, 0.6, 0.8. 1.0 and 1.2 mm)
Electronics
In the world of delta printers, the DuetWifi controller board is the superior choice. We’ll hook up a touch screen with PanelDue to easily control the machine without the need for a connected PC. We’ll also have an IR probe near the hotend as well as a PT100 daughterboard. All of these components can be ordered from the duet3D website.
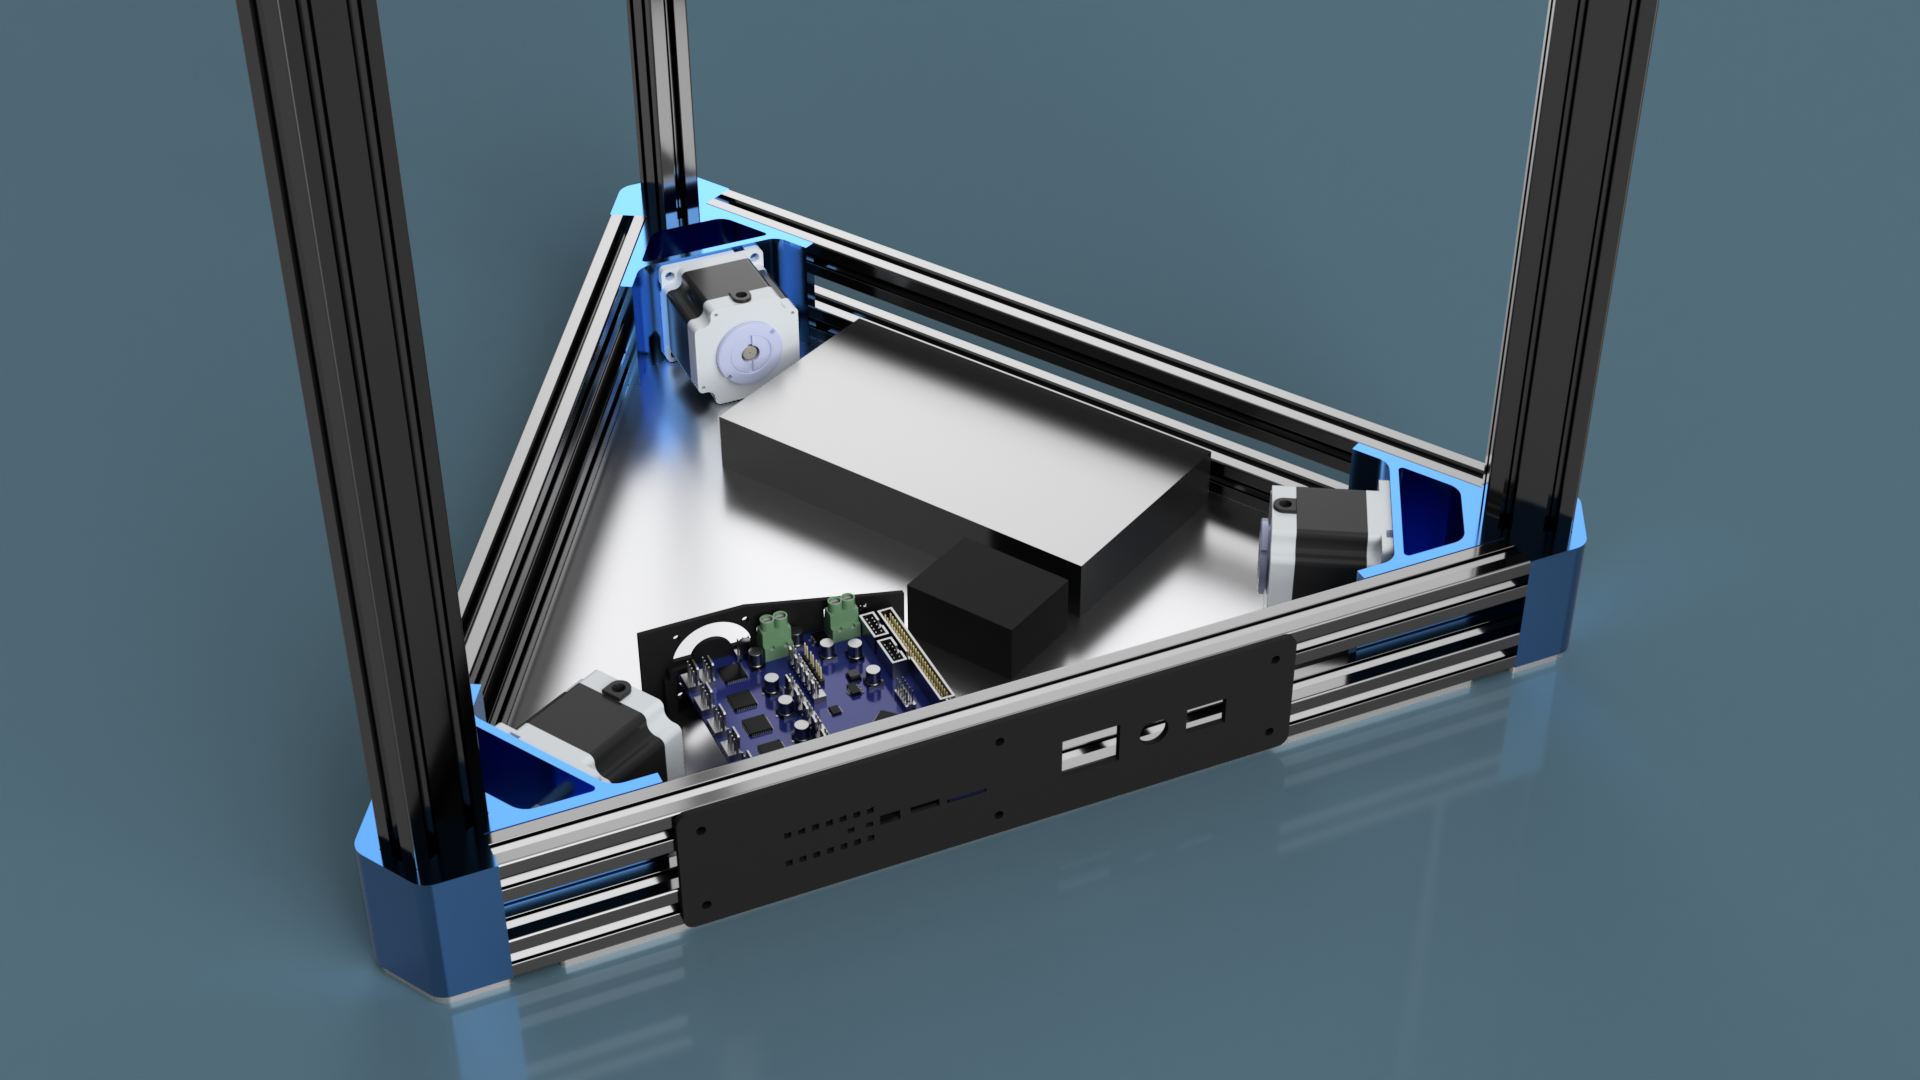
We also need a 24V PSU and a relatively beefy solid-state relay (SSR) for the bed heater, as well as connectors near the hotend to make it easier to swap out parts. To acheive good cooling we’ll probably mount a blow fan by the controller board as well as apply thermal paste between the baseplate and SSR and PSU as well as between motors and corners.
Electronics BOM:
- DuetWifi
- Touch screen
- PanelDue
- IR probe
- PT100 daughterboard
- PSU
- SSR
- Blow fan
- 3 pcs end-stop switches
- Connectors
3D Printed Parts
Several parts need to be 3D printed. Some of the designs we’ll print straight out of Thingiverse, while we’ll design others ourselves.

3D printed parts BOM:
- 3 pcs brackets for build plate
- 3 pcs brackets for guide rail carriages
- Fan bracket for the hotend
- 3 pcs end-stop switch brackets
- Screen bracket
- Electronics bracket and panel (we’ll mod the bracket for different fan mounting)
- Extruder motor bracket
- Filament holder
- 6 pcs vibration dampers
Continue reading about this 3D printer in part 2 where we start building!


