A well known Arduino function is delay() which pauses the program for an amount of milliseconds specified as parameter.
millis(), on the other hand, is a function that returns the amount of milliseconds that have passed since program start.
At first glance you may doubt the usefulness of this function. The fact is that it’s extremely useful in many scenarios, often “replacing” delay() completely. Let’s first look at how we can use millis() almost exactly like delay().

Using millis() like delay()
int period = 1000;
unsigned long time_now = 0;

void setup() {
	Serial.begin(115200);
}

void loop() {
	time_now = millis();

	Serial.println("Hello");

	while(millis() < time_now + period){
		//wait approx. [period] ms
	}
}
If you want your code to just pause for 1000 ms at the end of each loop iteration, the code above is a bit silly. You can just use delay(1000) instead. The only difference between the code above and a code with delay(1000) at the end is that the loop in the above code will run quite accurately once each second. The loop in a code with delay(1000) will run a bit less frequent since it also takes some time to execute Serial.println("Hello").
Why Use millis() Instead of delay()?
We will now look at two advantages with millis() compared to delay().
Accurate Timing
The first advantage we’ll discuss is accurate timing. Code-wise, we covered this in the last chapter. With millis() we can ensure that the loop runs as often as we want, regardless of the execution time (obviously as long as the execution time is less time the desired period). With delay() this is not possible since we do not know how long the loop execution time is.
Accurate timing like this is very useful when sampling at a certain frequency or running filters, among other things.
Non-blocking
The other advantage with millis() is that it won’t prevent us from running code while “waiting”.
Let’s say we want to print “Hello” over serial once each second while doing other stuff in the meantime. This is not possible with delay() since it pauses the entire code. Here’s one way we can do this:
int period = 1000;
unsigned long time_now = 0;

void setup() {
	Serial.begin(115200);
}

void loop() {
	if(millis() >= time_now + period){
		time_now += period;
		Serial.println("Hello");
	}

	//Run other code
}
This chunk of code is pretty similar to the first chunk, except that it doesn’t block the rest of the program when not printing over serial.
Example: a Simple Scheduler
Let’s write a simple example where we create a scheduler that prints certain bits of text at different intervals.
#define INTERVAL_MESSAGE1 5000
#define INTERVAL_MESSAGE2 7000
#define INTERVAL_MESSAGE3 11000
#define INTERVAL_MESSAGE4 13000

unsigned long time_1 = 0;
unsigned long time_2 = 0;
unsigned long time_3 = 0;
unsigned long time_4 = 0;

void print_time(unsigned long time_millis);

void setup() {
	Serial.begin(115200);
}

void loop() {
	if(millis() >= time_1 + INTERVAL_MESSAGE1){
		time_1 +=INTERVAL_MESSAGE1;
		print_time(time_1);
		Serial.println("I'm message number one!");
	}

	if(millis() >= time_2 + INTERVAL_MESSAGE2){
		time_2 +=INTERVAL_MESSAGE2;
		print_time(time_2);
		Serial.println("Hello, I'm the second message.");
	}

	if(millis() >= time_3 + INTERVAL_MESSAGE3){
		time_3 +=INTERVAL_MESSAGE3;
		print_time(time_3);
		Serial.println("My name is Message the third.");
	}

	if(millis() >= time_4 + INTERVAL_MESSAGE4){
		time_4 += INTERVAL_MESSAGE4;
		print_time(time_4);
		Serial.println("Message four is in the house!");
	}
}

void print_time(unsigned long time_millis){
	Serial.print("Time: ");
	Serial.print(time_millis/1000);
	Serial.print("s - ");
}
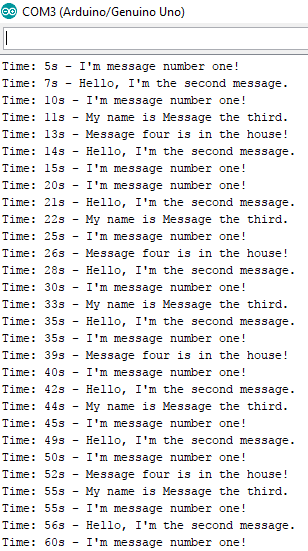
Here’s what the first 60 seconds in the serial monitor looks like:
This is a nice and easy way to synchronize executions in your code. You are able to run other code simultaneously as well.
micros() and Overflowing
Just like delay() has a microsecond-version called delayMicroseconds(), millis() has micros(). If you need better resolution, micros() may be the way to go.
However, be aware that micros() will overflow after approximately 70 minutes, compared to millis()‘s 50 days. This means that the functions’ return values will start all over from zero.
More importantly: to learn how you can avoid the overflow issue alltogether, read this blog post.
Summary
millis() and micros() are really handy functions to use when dealing with timing tasks. If you’re not aware of these, you might end up using delay() instead, which won’t always work that well (if at all).
For more Arduino tips & tricks, check out our Arduino Tutorials blog category. Stay tuned for more Arduino-related content in the future as well!
October 15th 2018 – Updated with link to blog post about avoiding the potential overflow issue.
January 9th 2020 – Edited the code with some inputs from Dimitris (from CityLab)